Bracketing and HDR

These 5 images were bracketed 2/3's of a stop apart. So the image spans 3 1/3 stop total.
Landscape photography offers many opportunities for High Dynamic Range shooting(HDR). The dynamic range of an image or a scene explained in rough terms is the light range between the brightest part of the shot and the darkest part of the shot. Some cameras can automatically capture a 3-4 stop range of an image without "blowing out" the lightest part of that shot, otherwise known as the highlights. Blown out means a section of the image is pure white, has zero detail, and is therefore similar to a "digital hole" in the image. The opposite of that is a black hole. The shadow is so dark that it's just pure black. Again zero details. In certain black and white scenes you want a small percentage of the image to reach a pure white and a pure black segment, but a small percentage. Like single digits. One of the tools that have emerged as a valuable product in photography is HDR shooting via bracketing. Bracketing is a minimum of 3 images captured at varying, uniformed exposure separations. Such as -2, 0, +2 on your camera's light meter. -2 references 2 stops dark, or underexposed, based on your camera's internal light meter reading. 0 means it's dead-on or perfectly exposed, and +2 means 2 stops bright, or overexposed. These 3 images are then imported into HDR software and they are "sandwiched" together into a single image. It's way more complicated than that but that's the overall explanation of what's occurring. The software attempts to evenly blend in the areas that are too bright, with the areas that are too dark and the result is usually similar to what your eye may have been seeing. Again there is a much deeper and more scientific explanation but this is not that place. Today anyway. Now you may have already started thinking about introducing errors into this process if the images do not line up. You would be correct. For this reason, bracketing should be shot on a sturdy tripod/head combination and the camera should be triggered without touching it. Either by using a remote shutter switch, or setting up the camera's 2-second timer, giving the camera 2 seconds to stop shaking after you depress the shutter button. Bracketing can be done in 3 shots, 5 shots, 7 shots, or 9 shots. The separation can be set for 1/3 stop increments all the way to 3 full stops apart. There are several techniques and reasons for setting this up and it's one thing that gets covered in-depth in a Tony and Keith workshop.
Tony pretty much brackets all the time. On the Tony and Keith Photographic Workshops, Tony particularly uses it when he is shooting water. For the 2022 season, there will be a great deal of water on the workshops: northern Oregon and southern Oregon beaches as well as the central Colorado streams. Water is about the most dynamic thing that can be captured; it twists, jumps, splashes, and changes both color and surface texture on super-short notice. On aperture priority setting, a three-stop bracket will give three different water speeds for one push of the button. After checking the histogram, it is possible to further fine-tune to certain patterns that are particularly pleasing. Cloud coverage is also a great reason to bracket. Often times there are multiple layers to a cloud deck and by bracketing the dynamic range may vary by 3-5 stops. At the Tony and Keith Photography workshop in North Dakota, the power of bracketing and HDR processing is very evident. Keith calls it the angry sky look, but that is usually when processed BW. The color skies with multiple layers of puffy clouds ranging from white to medium grey give the images a certain depth that adds to the beauty.
There are many more applications for bracketing and HDR processing. While it has great applications it is also often poorly processed and images look like coloring book renderings. The software out there has a lot of sliders to add in or take out a lot of image features. To some, this is where they find "their style" for others their goal is to make it as realistic as possible so HDR is not detected.
It starts with great instructions and Tony and Keith can help. One-on-one classes or workshops for your best hands-on experiences.
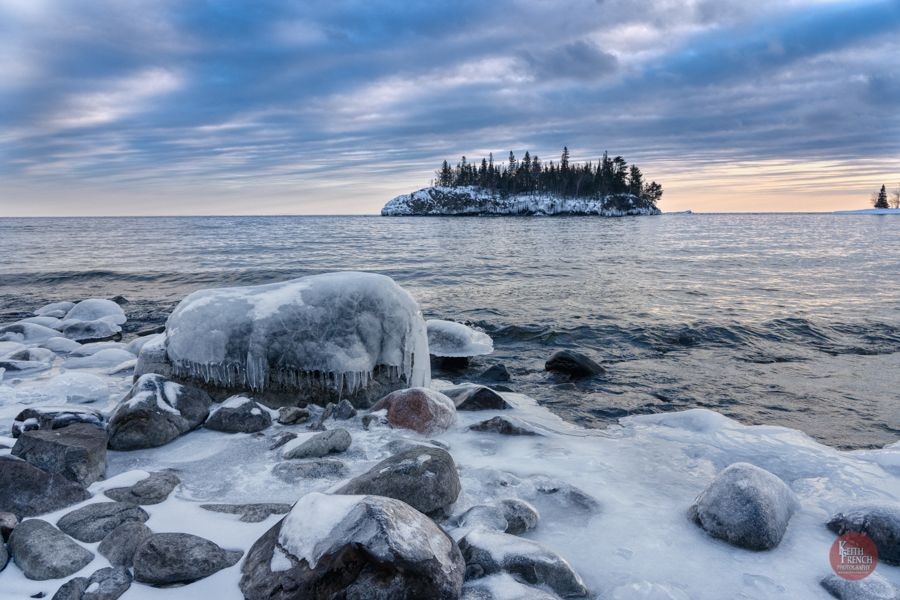
The image above is after the 5 images at the top of the screen were merged via HDR software.
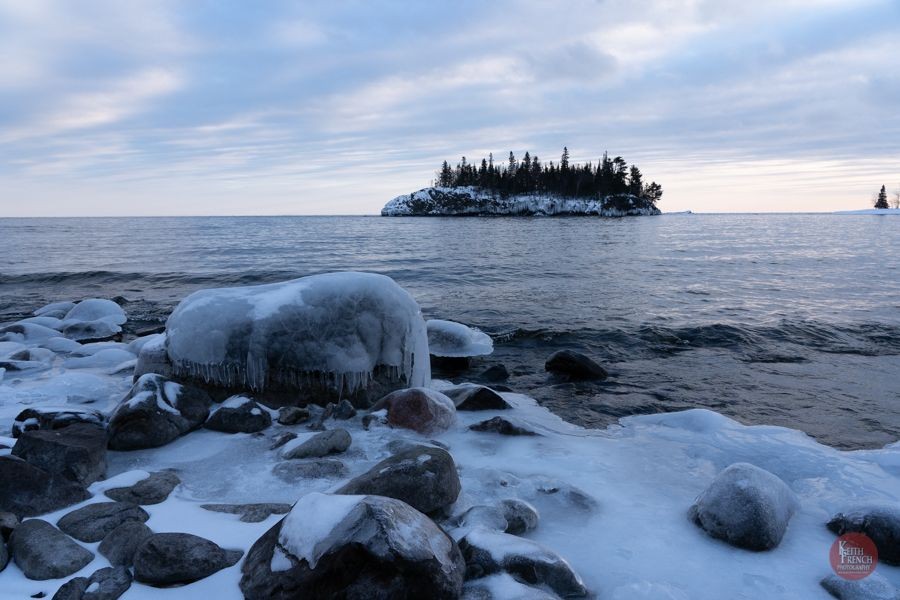
The image below is what the camera captured when shot at +/- 0 on the light meter. In the camera's "mind" this is the perfect exposure. The differences are enormous.
When you subscribe to the blog, we will send you an e-mail when there are new updates on the site so you wouldn't miss them.
Comments